Helpers:
Alex Bontempo, Julie Dragon, Heather Driscoll
General Information
The Carpentries project comprises the Software Carpentry, Data Carpentry, and
Library Carpentry communities of Instructors, Trainers, Maintainers,
helpers, and supporters who share a mission to teach foundational computational and data science
skills to researchers.
Want to learn more and stay engaged with The Carpentries? Carpentries Clippings is The Carpentries' biweekly newsletter, where we share community news, community job postings, and more.
Sign up to receive future editions and read our full archive: https://carpentries.org/newsletter/
Software Carpentry
aims to help researchers get their work done
in less time and with less pain
by teaching them basic research computing skills.
This hands-on workshop will cover basic concepts and tools,
including program design, version control, data management,
and task automation.
Participants will be encouraged to help one another
and to apply what they have learned to their own research problems.
Who:
The course is aimed at graduate students and other researchers.
You don't need to have any previous knowledge of the tools
that will be presented at the workshop.
Where:
Kalkin Hall, 55 Colchester Avenue, Burlington, VT 05405.
Get directions with
OpenStreetMap
or
Google Maps.
Requirements:
Participants must bring a laptop with a
Mac, Linux, or Windows operating system (not a tablet, Chromebook, etc.) that they have administrative privileges on.
They should have a few specific software packages installed (listed below).
Accessibility:
We are committed to making this workshop
accessible to everybody.
The workshop organizers have checked that:
The room is wheelchair / scooter accessible.
Accessible restrooms are available.
We are dedicated to providing a positive and accessible learning environment for all.
We do not require participants to provide documentation of disabilities or disclose any unnecessary personal information.
However, we do want to help create an inclusive, accessible experience for all participants.
We encourage you to share any information that would be helpful to make your Carpentries experience accessible.
To request accessibility support for this workshop, please fill out the
accessibility support request form.
If you have questions or need assistance with the accessibility support form please email us.
Glosario is a multilingual glossary
for computing and data science terms. The glossary helps
learners attend workshops and use our lessons to make sense of computational and programming jargon written in English by offering it
in their native language. Translating data science terms also provides a teaching tool for Carpentries Instructors to reduce barriers
for their learners.
Workshop Recordings:
Carpentries workshops are designed to be interactive rather than lecture-based, with lessons that build upon one another.
To foster a positive online learning environment, we strongly recommend that participants join in real time.
As a result, workshop recordings are not recommended and may not be available to learners.
Workshops FAQ:
For answers to frequently asked questions about workshops,
refer to the Carpentries Workshop FAQ.
Code of Conduct
Everyone who participates in Carpentries activities is required to conform to the Code of Conduct. This document also outlines how to report an incident if needed.
Collaborative Notes
We will use this collaborative document for chatting, taking notes, and sharing URLs and bits of code.
Surveys
Please be sure to complete these surveys before and after the workshop.
To participate in a
Software Carpentry
workshop,
you will need access to software as described below.
In addition, you will need an up-to-date web browser.
R is a programming language
that is especially powerful for data exploration, visualization, and
statistical analysis. To interact with R in our lessons, we typically use
RStudio.
Note that if you have separate user and admin accounts, you should run the
installers as administrator (right-click on .exe file and select "Run as
administrator" instead of double-clicking).
Otherwise problems may occur later, for example when installing R packages.
Navigating to CRAN and following the instructions outlined there, using your package manager. We have reproduced the commands below:
Use the terminal command prompt to type/copy-and-paste these commands in, pressing Enter after each line to run the command.
Do not run the lines with # at the start of each line, as this indicates a comment and is not part of the command.
    # update indices
    sudo apt update -qq

    # install two helper packages we need
    sudo apt install --no-install-recommends software-properties-common dirmngr

    # add the signing key for these repos
    wget -qO- https://cloud.r-project.org/bin/linux/ubuntu/marutter_pubkey.asc | sudo tee -a /etc/apt/trusted.gpg.d/cran_ubuntu_key.asc

    # add the repo from CRAN
    sudo add-apt-repository "deb https://cloud.r-project.org/bin/linux/ubuntu $(lsb_release -cs)-cran40/"

    # install R itself
    sudo apt install --no-install-recommends r-base
Two options are available for setting up your device so that you’re ready to learn in our workshops with Microsoft Windows.
The first is Git for Windows (often referred to as “Git Bash”), and the second is Windows Subsystem for Linux v2 (“WSL 2”).
If you choose to install WSL 2, you will need Administrator (“admin”) privileges on your laptop/PC.
If you have a device provided by an institution that does not give you admin rights, please either request that they:
Give you admin rights (temporarily or otherwise) to install WSL 2 yourself OR
Install WSL 2 for you
If you experience any issues, please install Git for Windows using the instructions below.
Help! What should I use?
We recommend Git for Windows as the default bash experience for Windows users attending our workshops, as it is the most straightforward to install and use, and does not require admin privileges.
However, it has limited functionality compared to a full Linux environment, and when you continue your data science learning after the workshop you will find that Git Bash does not support all the tools and workflows you might need.
We recommend that after the workshop, you consider installing WSL 2 to get a more complete Linux experience within your Windows environment, and to have access to the full range of tools and software available on Linux.
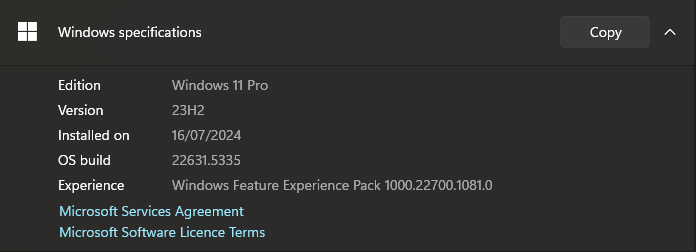
Checking your Windows Version
Click on the Windows Start Menu button in the bottom left corner of your screen, or tap the Windows button on your keyboard, and type “System” in the search bar.
Click the “System (Control Panel)” option.
In the window that opens, there will be information about your current Windows system, including the version. Here is an example from Windows 11:
Depending on your version, please go to the relevant instructions below.
Windows XP/Vista/7/8
These versions of Windows are considered End Of Life, and are not recommended for use in modern data science.
Software may experience issues, and security updates are also not available which puts your machine at risk.
Please consider upgrading your Windows version if you are able to do this yourself, or speak with your local IT administrator to discuss options available to you to upgrade.
If you are running any of these Windows versions, please install Git for Windows using the installation instructions below.
Windows 10 (earlier than version #1903)
For older versions of Windows 10 (version 1903/OS build 18362 and below), please follow the Git for Windows installation instructions below.
Windows 10 (version #1903 and later) and Windows 11
Windows 11 and later versions of Windows 10 support WSL 2, so following the workshop where you will use Git Bash, we recommend that you consider installing WSL2.
If you are not comfortable installing WSL 2, please follow the Git for Windows installation instructions below.
Click on "Next" four times (two times if you've previously
installed Git). You don't need to change anything
in the Information, location, components, and start menu screens.
From the dropdown menu, "Choosing the default editor used by Git", select "Use the Nano editor by default" (NOTE: you will need to scroll up to find it) and click on "Next".
On the page that says "Adjusting the name of the initial branch in new repositories", ensure that
"Let Git decide" is selected. This will ensure the highest level of compatibility for our lessons.
Ensure that "Git from the command line and also from 3rd-party software" is selected and
click on "Next". (If you don't do this Git Bash will not work properly, requiring you to
remove the Git Bash installation, re-run the installer and to select the "Git from the
command line and also from 3rd-party software" option.)
Select "Use bundled OpenSSH".
Ensure that "Use the native Windows Secure Channel Library" is selected and click on "Next".
Ensure that "Checkout Windows-style, commit Unix-style line endings" is selected and click on "Next".
Ensure that "Use Windows' default console window" is selected and click on "Next".
Ensure that "Default (fast-forward or merge) is selected and click "Next"
Ensure that "Git Credential Manager" is selected and click on "Next".
Ensure that "Enable file system caching" is selected and click on "Next".
Click on "Install".
Click on "Finish" or "Next".
If your "HOME" environment variable is not set (or you don't know what this is):
Open command prompt (Open Start Menu then type cmd and press Enter)
Type the following line into the command prompt window exactly as shown:
setx HOME "%USERPROFILE%"
Press Enter, you should see SUCCESS: Specified value was saved.
Quit command prompt by typing exit then pressing Enter
This will provide you with both Git and Bash in the Git Bash program.
Installing WSL 2
If you are confident to try installing WSL 2 rather than Git Bash, please use the following instructions.
We will install Ubuntu via the Microsoft Store.
It is possible to install WSL within the Windows Powershell command prompt, and full instructions are on the Microsoft website.
Note: You will need to restart your computer after installing WSL 2, so make sure you have saved any work.
Why Ubuntu?
Linux comes in many flavours, called “distributions”, and each has its own benefits, features and quirks!
WSL 2 is a fully fledged Linux environment that runs completely within your Windows 10 or 11 operating system.
While there are many Linux distributions available to install (e.g. Ubuntu, Debian, Fedora, Mint, Arch, Gentoo, and hundreds more!), WSL 2 only supports a handful of distributions listed above due to the way it needs to be integrated with Windows itself.
So, we will use the default that WSL 2 recommends, Ubuntu.
Via the Microsoft Store:
Open the Windows Start Menu button in the bottom left corner of your screen (four blue squares), or tap the Win Windows button on your keyboard (between the bottom left CTRL and ALT keys) and search “store”. Open the Microsoft Store.
In the Microsoft Store search bar, type “wsl ubuntu”, and select the Ubuntu 22.04 or 24.04 option (at the time of writing, Ubuntu 22.04.06 LTS, or Ubuntu 24.04.01 LTS):
If a pop-up window appears asking if you want to make changes to your device, select “Yes”
The install should proceed, and this can take a few minutes depending on your PC performance and internet download speed.
Once installed, restart the computer.
Once restarted, reopen the Windows Start Menu button in the bottom left corner of your screen, or tap the Windows button on your keyboard. In the search bar, type either:
Ubuntu: selecting Ubuntu 22.04.06 LTS or Ubuntu 24.04.01 LTS from the Start Menu will open the bash prompt directly, or
Terminal: this will open a new Windows Terminal window, which will look like a blank black window with a blinking cursor waiting for input. Note: This terminal might default to Powershell, and not Ubuntu. If this is the case, click the down arrow in the Terminal window menu bar at the top, and then click Ubuntu 22.04 or 24.04, depending on the version you installed. It will also show keyboard shortcuts (e.g. Ctrl+Shift+1) to open the various prompts available within the Terminal application.
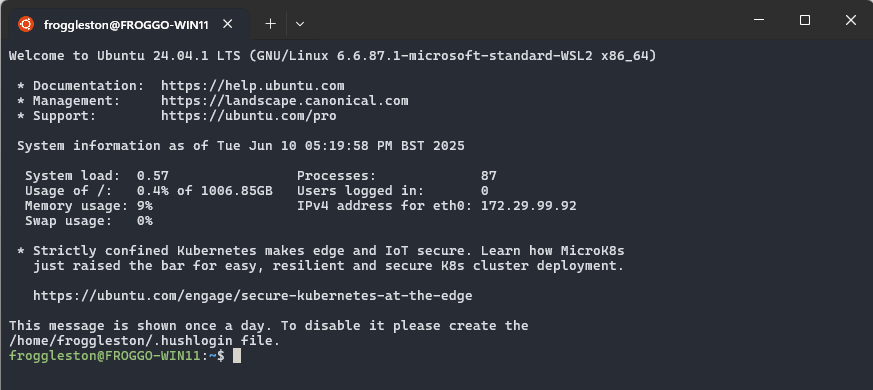
Once you have installed WSL 2, you will need to install some software within the Ubuntu operating system in order to use it effectively. Make sure you are using Ubuntu by checking you see the bash prompt:
The first thing to do is to update the list of available Ubuntu software packages, using a tool called apt.
Type the following command into the bash prompt:
sudo apt update
Note: You will be prompted to enter your password. This is the password you set when installing Ubuntu, and will not show up on the screen as you type it in.
This is a security feature of the terminal, and is normal behaviour.
Install updated versions of the base packages required across all our lessons, by typing:
If you get stuck, please contact your workshop organisers to get assistance before the workshop starts.
The default shell in Mac OS X Ventura and newer versions is Zsh, but
Bash is available in all versions, so no need to install anything.
You access Bash from the Terminal (found in
/Applications/Utilities).
You may want to keep Terminal in your dock for this workshop.
To see if your default shell is Bash type echo $SHELL
in Terminal and press the Return key. If the message
printed does not end with '/bash' then your default is something
else, you can change your current shell to Bash by typing
bash and then pressing Return. To check
your current shell type echo $0 and press Return.
To change your default shell to Bash type chsh -s /bin/bash and
press the Return key, then reboot for the change to take effect. To
change your default back to Zsh, type chsh -s /bin/zsh, press the
Return key and reboot. To check available shells, type
cat /etc/shells.
The default shell is usually Bash and there is usually no need to
install anything.
To see if your default shell is Bash type echo $SHELL
in Terminal and press the Return key. If the message
printed does not end with '/bash' then your default is something
else, you can change your current shell to Bash by typing
bash and then pressing Return. To check
your current shell type echo $0 and press Return.
To change your default shell to Bash type chsh -s /bin/bash and
press the Return key, then reboot for the change to take effect. To
change your default back to Zsh, type chsh -s /bin/zsh, press the
Return key and reboot. To check available shells, type
cat /etc/shells.
Note for Windows Users
If you have used Windows Subsystem for Linux ("WSL2") please open your Ubuntu bash terminal and follow the Linux instructions for each of the software packages below.
If not, please follow the Windows instructions.
Git
Git is a version control system that lets you track who made changes
to what when and has options for easily updating a shared or public
version of your code
on github.com. You will need a
supported
web browser.
You will need an account at github.com
for parts of the Git lesson. Basic GitHub accounts are free. We encourage
you to create a GitHub account if you don't have one already.
Please consider what personal information you'd like to reveal. For
example, you may want to review these
instructions
for keeping your email address private provided at GitHub.
Please open the Terminal app, type git --version and press
Enter/Return. If it's not installed already,
follow the instructions to Install the "command line
developer tools". Do not click "Get Xcode", because that will
take too long and is not necessary for our Git lesson.
After installing these tools, there won't be anything in your /Applications
folder, as they and Git are command line programs.
For older versions of OS X (10.5-10.8) use the
most recent available installer labelled "snow-leopard"
available here.
(Note: this project is no longer maintained.)
Because this installer is not signed by the developer, you may have to
right click (control click) on the .pkg file, click Open, and click
Open in the pop-up dialog.
If Git is not already available on your machine you can try to
install it via your distro's package manager. For Debian/Ubuntu run
sudo apt-get install git and for Fedora run
sudo dnf install git.
 Depending on your version, please go to the relevant instructions below.